

By: Liv Kleiber and Salome Meyer
Category Archives: Travel/Food

Crepe recipe and review
By: Nils Hileson

Ingredients:
- 2 eggs
- 3/4 cup of milk
- 1/2 cup of water
- 1 cup of flour
- 3 tablespoons of melted butter
Steps:
- Add all ingredients to a bowl and whisk vigorously for 10-20 seconds until smooth.
- Put the batter in a bowl with a lid and place in the fridge for 1-2 hours
- Put a pan on a burner at low-medium heat and add butter
- Add 1/3 cup of batter in pan
- Swirl pan until the surface is coated with a thin layer of batter
- Let sit until the edges start to peel off the pan then flip the crepe
- Wait until it’s only a little crispy and then put on a plate
You can add toppings like;
- Butter & sugar
- Jam & whipped cream
- Nutella & banana
- Butter, sugar & cinnamon
- Scrambled egg
The crepes were really good, I made three; one with Nutella and banana, one with cinnamon and sugar and one with scrambled egg. Crepes are really good due to how many different things you can put on them. While most crepes are made sweet you could make one more savory.
They are also pretty easy to make but it’s easy to accidentally cut them due to how thin they are.
The crepes tasted really good the egg one might’ve been my favorite as the cheese I put in the egg and the crepe itself worked really well together. The other crepes also tasted really good though, both being sweet in different ways.
Due to how much batter I had we ended up with a lot of extra crepes since the crepe doesn’t take much batter to make due to being so thin. When making crepes the first one will almost always come out really bad as the pan isn’t quite ready yet so the first one will look bad.
Overall crepes are really good and pretty easy to make.
This recipe was a modified version of my dad’s.

Raking Our Top 5 Cereals
By: Justice Webb & Justine Webb

Tier Ranking Fast Food Restaurants
By: Liv Kleiber & Salome Meyer

Brownie recipe review
By: Norah Hoglund

Brownies are one of my favorite desserts. I love chocolate pastries and a good brownie is one of my favorite things ever. I have made many different recipes and today I am reviewing a recipe from Baker by Nature.
Link to the recipe: here
Review
This recipe made really good brownies all around. The top was crackly, just like it was advertised. They were very fudgy in the middle, but not undercooked. The edges were very crispy, which is good for the edge piece kind of people. I really enjoyed the chocolate chips that were mixed into the batter. They added a very nice texture to contrast the pastry texture. The chocolate flavor was strong, but it was still very sweet. As the brownies cooled, the edges got a bit more crispy. I personally prefer softer edges, but some people like them crispier. These brownies were really great overall and would go great with vanilla ice cream. I would rate them a 9/10 overall.
Recipe
- 1 cup (120g) all-purpose flour
- 1/2 teaspoon baking powder
- 1/2 teaspoon salt
- 1/2 cup (43g) unsweetened cocoa powder
- 1 teaspoon espresso powder optional (don’t use if you don’t like coffee)
- 3/4 cup (170g) unsalted butter
- 2 Tablespoons (28ml) oil canola, vegetable, or coconut will work
- 1 and 1/3 cups (265g) granulated sugar divided
- 2 large large eggs
- 1 large egg yolk
- 2 teaspoons vanilla extract optional, but recommended
- 3/4 cup (128 grams) chocolate chips
instructions
- Preheat oven to 350 degrees (F) (175 degreed C). Line an 9×9-inch baking pan with parchment paper. Spray lightly with non-stick baking spray and set aside.
- In a large bowl, sift together the flour, baking powder, salt, cocoa powder, and espresso powder. Set aside until needed.
- In a medium saucepan, combine the butter, oil, and 1/3 cup of the sugar. Heat over medium heat, stirring frequently, until butter is completely melted. Remove from heat.
- In a large mixing bowl, combine the eggs, egg yolk, vanilla (if using) and remaining sugar. Whisk until well combined, about 30 seconds.
- Slowly, pour the warm butter mixture into the egg mixture, adding it very gradually (a little bit at a time) and whisking constantly until completely combined.
- Add in the dry ingredients and chocolate chips and, using a rubber spatula, slowly stir until just combined.
- *Do not over mix! Stop stirring when you see the last trace of dry ingredients. Over mixing will give you cakey brownies.
- Scrape the batter into the prepared pan and smooth the top.
- Bake for 28 (to 30 minutes) or until the edges are firm and the top is shiny and slightly cracked.
- Place pan on a cooling rack and cool completely before slicing.

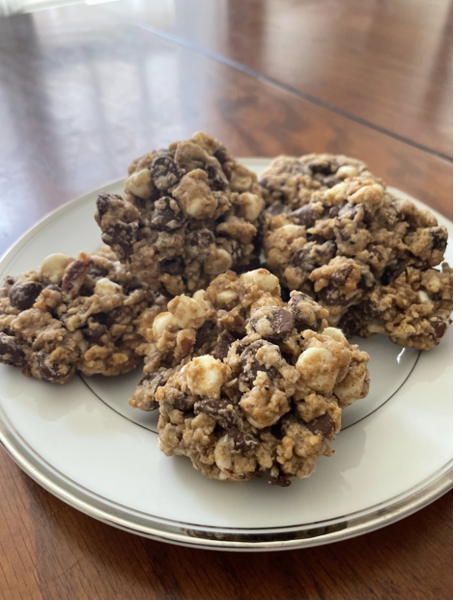
Recipe review: Everything cookies (Family recipe)
By: Austin Bailey-Zimmerman
Ingredients:
- 2 sticks butter
- 1 cup brown sugar
- 1/2 cup granulated sugar
- 2 teaspoons vanilla
- 2 eggs
- 1 1/2 cups all purpose flour
- 1 teaspoon baking soda
- 1 teaspoon baking powder
- 1 teaspoon salt
- 3 cups QUICK oats
- 1 bag chocolate chips
- 1 bag white chocolate chips
- 1 cup raisins
- 1 cup chopped pecans or sunflower seeds
Instructions:
- Preheat the oven to 350ºF.
- Soften butter and in a medium mixing bowl, mix the butter, sugars, eggs, and vanilla until combined.
- In a separate bowl, mix all of the dry ingredients together.
- Combine both bowls into one.
- Fold in the chocolate chips, raisins, and pecans/sunflower seeds.
- Roll batter into golf ball sized balls and set on a baking sheet.
- Bake for 8-10 mins or until golden brown.
- Take out and let cool.
- Enjoy!
Review:
Have you ever tried to find the perfect cookie to bake? For me, this recipe is it. My family and I made this recipe and decided to name these cookies “everything cookies” because they have everything you could think of for a cookie.
I associate these cookies with my mother because I have always made these cookies with my mom and older brother ever since I was a little kid. Whenever we would make everything cookies we would always have extra so we would share them with our neighbors, my grandma, and I would bring a bag to school and share with my friends at lunch. I think these cookies really made me feel connected to the people around me, especially my mom.
I have a lot of great memories making these cookies with my family. When we put them in the oven, the whole house would fill with the sweet warm smell of cookies and it would stay for the rest of the day. When we finally took the cookies out, we would always put on a movie or show and sit down in the living room with a glass of cold milk and the cookies still warm. They were always perfectly gooey on the inside, but golden around the edge.
Sometimes the ingredients change. Sometimes we add new things or take away something, but they always taste nostalgic. These have always been my favorite dessert, and maybe they’ll be yours too! Try these out! Enjoy!

Review of copycat Crumbl red velvet white chocolate chip cookies
By: Grace Wright

Recipe-
Ingredients
▢ 1 1/2 cup butter, softened
▢ 1/2 cup granulated sugar
▢ 1 1/2 cup brown sugar
▢ 2 egg
▢ 1 1/2 tbsp vanilla extract
▢ 4 cups all purpose flour
▢ 1/2 cup cocoa powder
▢ 2 tsp baking soda
▢ 1 tsp salt
▢ red food coloring
▢ 2 cup white chocolate chips
Instructions-
Preheat the oven to 350°.
Cream together the butter, granulated sugar and brown sugar.
Add the egg and vanilla. Mix until light in color and creamy.
Add in the dry ingredients (flour, cocoa, baking soda and salt), mix into the dough. Mix until completely combined. The dough will be soft.
Mix in the red food coloring (add until it looks like the desired color), then fold in the white chocolate chips.
Use a 1/2 cup measuring cup to portion out the dough. Roll the dough and flatten them slightly. Arrange 6 cookies per cookie sheet. This will make 12 cookies.
Bake at 350° for 15-17 minutes – the cookies should spread slightly, crackle a little bit and the centers should not look shiny and wet anymore.
Allow the cookies to cool for at least 10 minutes on the pan before serving. Serve warm.
These cookies were pretty easy to make but there would be some modifications I would make. One, I would change when you add the food coloring. The dough is a thicker kind so when it said to add the food coloring last, I struggled. I couldn’t mix the coloring evenly throughout the dough, so it ended up streaky and not really red velvet. I would recommend adding the food coloring when you are mixing all the wet ingredients. This makes sure the food coloring mixes nicely and you can add some more in the middle of mixing the dry ingredients in if you want it more red.
I would also recommend mixing the chocolate chips by hand. Once again, because the dough is thicker my stand mixer struggled getting the mix evenly throughout the dough. This made some of my cookies to have no chocolate chips or some to have a lot.
Finally, I would recommend that if you don’t like huge cookies to make them smaller. I think they are good this big but for my family we just like smaller cookies so then you don’t have to break them apart if you don’t want that big of a cookie. My parents agreed that they would have enjoyed them more if they were smaller.
I would say these are pretty close to the ones from Crumbl, but Crumbl’s have a better texture and are more flavorfull. Overall, I really liked making these cookies and they were tasty. I think most people can bake them with ease with just a few adjustments.
Here is the link to the recipe I used:
Jimmy John’s
By: Maya Song
Jimmy John’s, the popular sandwich franchise, was founded in January 1983 in Charleston, Illinois, by Jimmy John Liautaud. Jimmy John’s is an American multinational sandwich franchise.
After college Jimmy took a twenty five thousand dollar loan from his father to start a business with the promise that if his business did fail he would enlist in the United States Army. Jimmy decided on starting a hot dog cart but he later came to the realization that a hot dog cart might be too expensive for his budget and decided against the hot dog stand.
Later on Jimmy came across a sandwich shop and considered starting one himself. He knew that there’d be more ingredients so he’d have to be careful with his budget. He started to bake his own bread and purchased premium meats from a nearby neighborhood market to limit spending.
When their first restaurant opened in Charleston, the menu consisted of four different sandwiches. Over ten years later, Jimmy John’s first franchise opened in Eau Claire, Wisconsin. About three years after opening their first franchise Jimmy John’s had created their first drive through restaurant in Saint George, Utah. They then began being considered as a fast food restaurant with their drive through, quick service, and fast delivery.
The first four sandwiches The Pepe, Totally Tuna, Turkey Tom, and Vito’s are still on the menu today and are still very popular items. When Jimmy John’s first opened they had smoked ham and provolone, turkey, homemade tuna salad and capicola & salami. From there, the restaurant has been gaining more and more ingredients for customer satisfaction.
Today, the menu has 18 sandwiches and even consists of unwichs. An unwich is for those who crave less bread and carbs so the bread is replaced by lettuce leaving all unwichs with twelve grams of carbs or under.

Recipe review: Peanut butter protein balls
By: Austin Bailey Zimmerman

Ingredients:
- 2 cups rolled oats
- 1 cup natural peanut butter or other nut butter
- ½ cup honey
- ¼ cup mini chocolate chips
- ¼ cup unsweetened shredded coconut
Instructions:
- Combine oats, peanut butter (or other nut butter), honey, chocolate chips and coconut in a medium bowl.
- Using a 1-tablespoon measure, roll the mixture into balls.
- Put balls in the fridge (or freezer) to harden.
- Enjoy!
Review:
This recipe was great to make. It took me less than 10 minutes to make the balls, and it was so easy. There aren’t many ingredients at all and only 3 steps! The balls themselves tasted amazing, the peanut butter was very savory so the sweet honey really balanced it out. The chocolate chips and oats gave it a bit of a crunch and great texture. Sometimes I like to dip them in melted chocolate and freeze them to make them into more of a dessert.
I absolutely love eating these before going to the gym or going on a run. They give me lots of energy and protein, just without the unnecessary additives like a protein bar has. It has all very natural ingredients and is so healthy. I also eat them just for a snack because they are very satisfying and filling.
I got this recipe from Eating Well (https://www.eatingwell.com/recipe/275207/peanut-butter-energy-balls/) by Lisa Valente. She made this recipe so easy to follow and the website is very easy to navigate. The peanut butter balls were so good and so healthy, and she balanced health and a treat perfectly.
I have made these many times now, and each time they are gone very quickly because my brother likes to eat them before a workout as well. I really enjoy them, and I think you would too! Try this easy recipe out!

S’mores cookie bar review
By: Alice Rapacz

Ingredients:
- ½ cup unsalted butter (room temperature)
- ¾ cup packed brown sugar
- 1 large egg (room temperature)
- 1 teaspoon vanilla extract
- 1 cup all-purpose flour
- 1 cup graham cracker crumbs (around 8 full sheets)
- ½ teaspoon baking powder
- ¼ teaspoon salt
- 1 cup semi-sweet chocolate chips
- 1 heaping cup marshmallow creme (fluff)
Directions:
- Preheat oven to 350 degrees and line an 8-inch square baking pan or 9-inch square baking pan with parchment paper and set aside.
- In a large bowl using a hand mixer or a stand mixer fitted with the paddle attachment, cream together the butter and brown sugar on medium-high speed until fluffy (about 2 minutes).
- Beat in the egg and vanilla extract until combined. (It may look curdled but that is ok) scrape down the sides of the bowl with a spatula.
- In a separate medium bowl mix together the flour, graham cracker crumb, baking powder, and salt.
- Pour the dry ingredients into the wet and mix on medium speed until combined.
- In your prepared baking pan, spread ⅔ of the cookie dough onto the bottom of the pan. The dough will be sticky so do your best to evenly spread the dough in a thin layer.
- Use a spatula to spread the marshmallow creme on top of the dough. It is very sticky so just do your best to spread it in an even layer.
- Sprinkle the chocolate chips on top of the marshmallow creme in an even layer.
- Using the remaining cookie dough, mold it into flat pieces and layer on top of the chocolate chips. (There won’t be enough dough to cover the whole top in a single layer, some marshmallow and chocolate chips will be exposed.)
- Bake for 25-30 minutes or until the top is golden brown.
- Remove from the oven and place the pan on a wire rack to cool completely.
- Lift the bars out of the pan and cut into squares
- Cover and store the leftover bars at rooms for up to 1 week.
- Lastly, Enjoy!
Review:
The process of making the bars was very straightforward and the recipe was easy to follow. Once the dough was made the only part that was kind of hard was the assembly, only because of how sticky the dough and marshmallow creme was. I used my hands to spread out the dough, which made it easier to make sure it was spread evenly to each corner. Using a rubber spatula to spread out the marshmallow creme was a lot easier than anything else because it didn’t stick to it as much. I found that placing a few dollops of the creme on the dough before spreading it out made it much easier.
The hardest part of the whole process was waiting. The combination of the baking time and cooling time felt like forever and the smell of sweet graham cracker filled the air.
These cookie bars were so good! The inside of the cookie was soft from the marshmallow and the actual cookie itself, and the outside had the perfect amount of crunch. The sweetness from the marshmallow complemented the bitterness from the chocolate. I wasn’t sure how the marshmallow creme would bake, I didn’t know if it would get hard like other marshmallows when they are cooked for a while, but they were still soft.
These bars were so good, I made them a second time. They were the perfect way to end the night and my family loved them. I think that these would be perfect for a summer night and definitely are a better version of the classic s’more.
